Getting started
Retro Creator runs next to RetroBat and turns real gameplay data into stream overlays and automations. Here is the full path from zero to a live overlay.
0. Install
- Download and run
RetroCreator-Setup.exe: it installs Retro Creator intoRetroBat\plugins\RetroCreator\and can launch it right away.
Windows SmartScreen
The installer is signed CN=nelfeTech (self-signed). On first launch
Windows may show a SmartScreen warning: click More info → Run anyway.
You can verify the download with the SHA-256 published on the release page.
1. Launch and connect
- Start RetroBat (EmulationStation), with the APIExpose plugin enabled.
- Launch Retro Creator. The app opens on the Listener view with a single button: Connect.
- Click Connect - the status bar at the bottom turns green
(
Connected). From now on every game you browse or play feeds the app.
No RetroBat around?
Click Try demo mode under the Connect button: a simulated game session runs through the whole pipeline so you can explore every view.
Under the hood - what Connect actually does
Retro Creator talks to the local APIExpose service (127.0.0.1:12345) shipped
with RetroBat: current game and artwork, plus the live gameplay events of the
running game. Nothing leaves your machine at this stage - the connection is
local, read-only, and reconnects by itself if you restart RetroBat.
The interface is organised around the Mode menu:
| Mode | What it is for |
|---|---|
| Listener | The pulse of your stream - every game event orbits the current game logo, live. |
| Designer | Compose your overlay views, popups and components. |
| Flows | Condition your automations: When… If… Then… - triggers can target one exact moment (Life lost) or a whole family (any score/collectible moment). |
| Event | The dashboard: activate your automated games, run chat contests and Live Contests. |
| Widgets | The catalogue of 20 ready-made stream mechanics - with a per-game compatibility badge and a 🧪 Test button that replays the moment without playing it. |
| Templates | Ready-made event views: one click creates the view in your workspace and opens it in the Designer. |
The Editions menu shows your license tier (Lite, Pro, Studio), and File → Settings holds your connections (OBS, Twitch, NelfeTech…).
The Monitor button in the status bar opens a terminal with the raw event log (6 lines) - handy to check what the games actually emit.
2. Build a view in the Designer
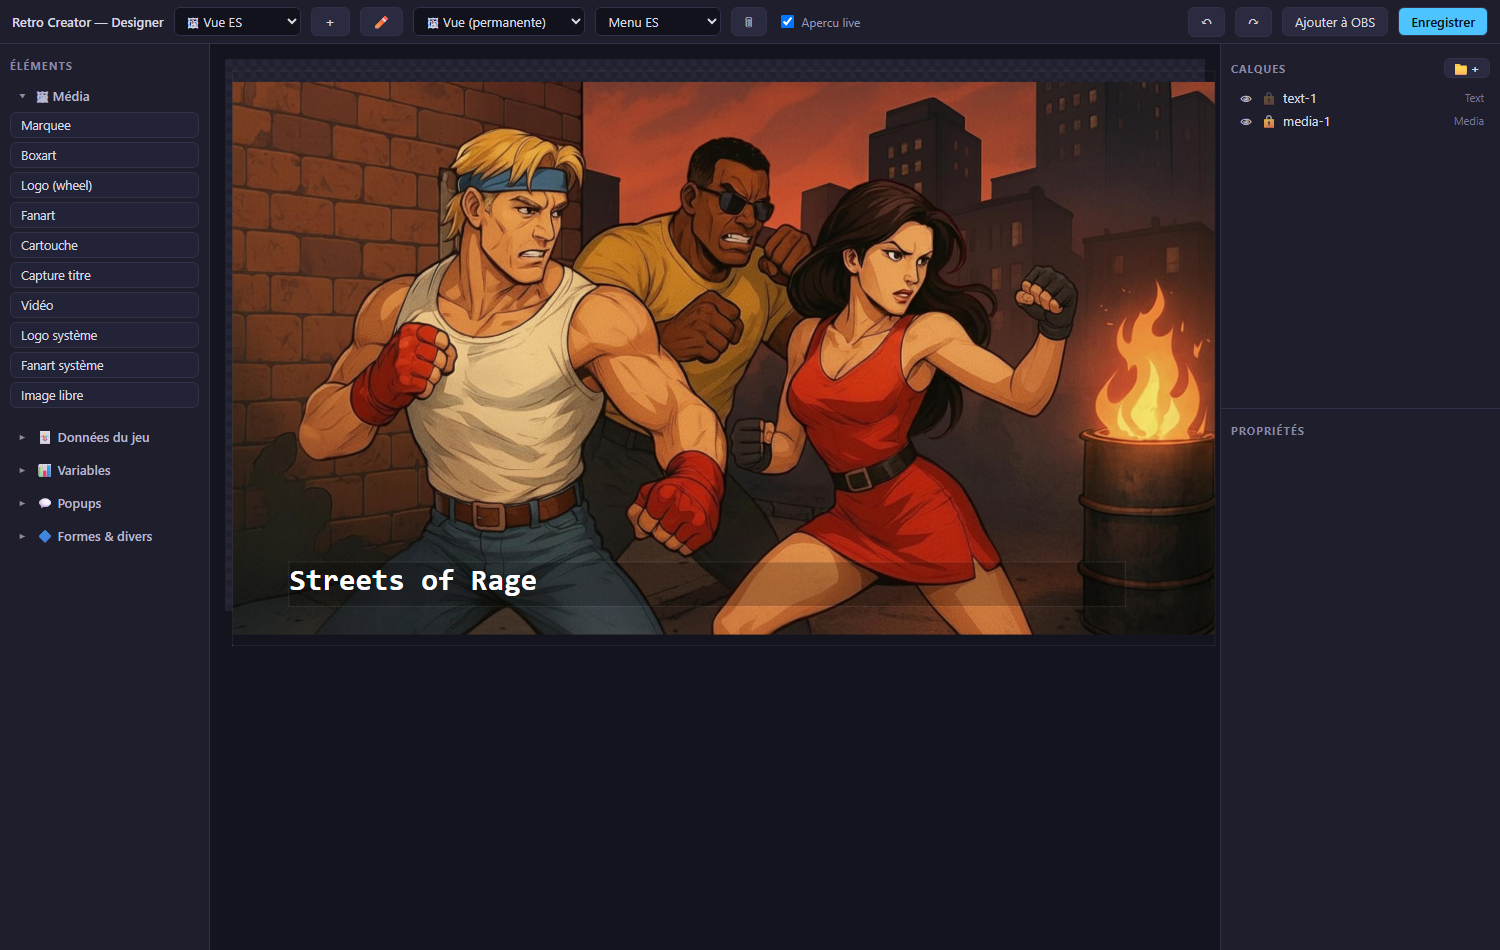
- Open Mode → Designer.
- Pick elements from the left palette - they are grouped by usage (Media, Game data, Variables, Popups, Shapes) and arrive pre-configured: Game title, Year, Rating ★, Marquee, Boxart, System logo…
- Everything follows a layers logic: reorder by drag & drop, group into folders, hide (👁) or lock (🔒) layers, rename them.
- Properties are grouped in three collapsible sections: Layer (position, size, fill, update transition), Content (data binding, composed text), Style (font - system or your own files -, size, colour, alignment, drop shadow, stroke).
- Live preview is on by default: the canvas shows the real data and artwork of the current game.
3. Send it to your streaming software
Click Add to OBS in the Designer header: the view is saved and pushed as a
browser source named RC - <view name> into the current scene
(requires the obs-websocket password, see Settings).
After the first push the button becomes Update in OBS.
Any web-capable streaming software works: the view is a plain local URL
(http://127.0.0.1:19780/overlay/<view>), so you can paste it manually into
Streamlabs, Meld Studio, etc.
4. Automate with Flows
Open Mode → Flows and describe reactions in plain sentences:
When life lost → Then show a popup « 💥 {game} strikes again! »
Conditions accept numbers (counter at least 100) and text
(chat command equals ring). Actions include popups (simple or a popup you
designed), counters, OBS scene/source/media control, webhooks, Discord -
scene and source selectors list your actual OBS content.
5. Settings
File → Settings… opens a dialog for:
- Twitch - your channel name. That is all it takes to read your chat (anonymous, read-only, no key): see Twitch integration.
- OBS Studio - the obs-websocket password (Tools → WebSocket Server Settings in OBS). Stored encrypted, never displayed.
- My media - a folder of your own images/videos, exposed to the Designer
as
user:sources. - Discord - a default webhook for announcements.
A light/dark theme toggle lives in File → Light/dark theme.
6. Save your work
File → Save writes your whole configuration (views + flows) into a single
.rct project file; File → Open… restores it - handy for backups or for
sharing a complete stream setup between machines.